Physical Address
304 North Cardinal St.
Dorchester Center, MA 02124
Physical Address
304 North Cardinal St.
Dorchester Center, MA 02124
Your Guide to the Latest in Tech
Your Guide to the Latest in Tech

ruminesia – If you’ve ever needed to capture something quickly on your iPhone—maybe a bug you want to show a friend, a tutorial you’re trying to save, or a moment in a game—you’ve probably wished there was a faster way to start recording. That’s where knowing how to use Quick Settings for screen recording on iPhone 15 becomes a game-changer. No apps, no digging through menus—just a swipe and a tap.
Many users don’t realize the Screen Recording shortcut isn’t always enabled by default, which can be frustrating when you need it right now. Maybe you opened Control Center expecting to see the icon, only to find… nothing. Luckily, adding and using this shortcut is simple once you know where to look.
Once your Screen Recording toggle is set up, capturing your screen becomes second nature. It’s fast, reliable, and built directly into iOS—perfect for everyday use, whether you’re troubleshooting, creating content, or just saving something before it disappears.
Key Highlights:
- Quick Settings offers the fastest way to start screen recording on iPhone 15.
- The Screen Recording control must be added to Control Center before use.
- A simple swipe and tap lets you begin recording with a 3-second countdown.
- Microphone audio can be enabled with a long-press on the recording icon.
- Recordings save automatically to the Photos app for easy access.
- Restarting the device or updating iOS can fix missing control issues.
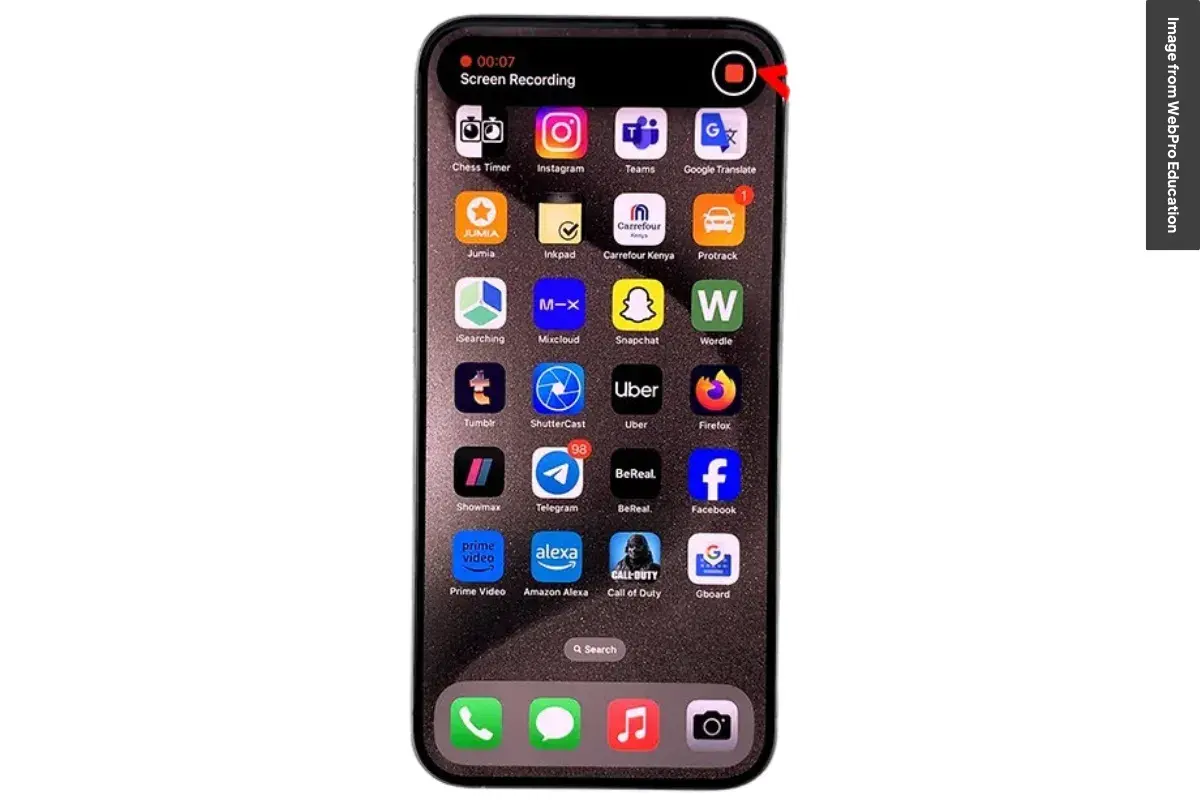
Using Quick Settings (Control Center) is the fastest way to start a screen recording on the iPhone 15. Once the Screen Recording control is added, you can begin capturing your screen in just a few taps—no third-party tools required.
If the Screen Recording icon isn’t visible, add it first:
You can also do this through Settings > Control Center.
Once the control is added:
To include microphone audio:
This Quick Settings method is ideal for quick captures, such as tutorials, app walkthroughs, or gameplay. If the control doesn’t show up after adding, try restarting your device or updating iOS. Let me know if you want a follow-up section for editing your recording.
Read More:
Here is the full FAQ section answering the most common questions about screen recording on iPhone 15.
If the button doesn’t appear, the feature likely hasn’t been enabled. Here’s how to add it:
To record your voice, you need to enable the microphone manually. Here’s how:
A silent recording is usually caused by one of the following:
No, the iPhone 15 does not allow recording audio from calls or FaceTime. Apple restricts this for privacy and legal reasons, so the system automatically mutes audio when recording during a call.
All screen recordings are automatically saved in the Photos app. You’ll find them in:
Streaming apps use DRM protection, which blocks captured visuals. That’s why recording content from apps like Netflix or Disney+ results in a black screen.
You can stop recording in two ways:
There’s no system-imposed time limit. You can record as long as your storage and device temperature remain safe. If the phone overheats or storage runs out, the recording may stop automatically.
Yes, any notifications that appear while recording will be captured. Turn on Do Not Disturb or Focus Mode if you want a clean, distraction-free recording.
Yes, you can perform basic edits directly in the Photos app. You can:
For advanced editing, you can export the video to a third-party editing app.
With the Quick Settings shortcut set up, you now know the simplest way to capture anything on your screen without slowing down your workflow. Understanding how to use Quick Settings for screen recording on iPhone 15 isn’t just a neat trick—it’s a small tweak that makes screen recording feel effortless.
The key takeaway is that a single swipe gives you instant access to a tool you’ll use more often than you expect, whether you’re troubleshooting an app, saving a tutorial, or sharing something interesting with friends. It’s a practical upgrade to your everyday iPhone habits.
Give it a try the next time you need to record your screen and see how much smoother it feels. If you’ve discovered your own tips or run into issues, feel free to share—your experience can help others, too.