Physical Address
304 North Cardinal St.
Dorchester Center, MA 02124
Physical Address
304 North Cardinal St.
Dorchester Center, MA 02124

Your Guide to the Latest in Tech
Your Guide to the Latest in Tech
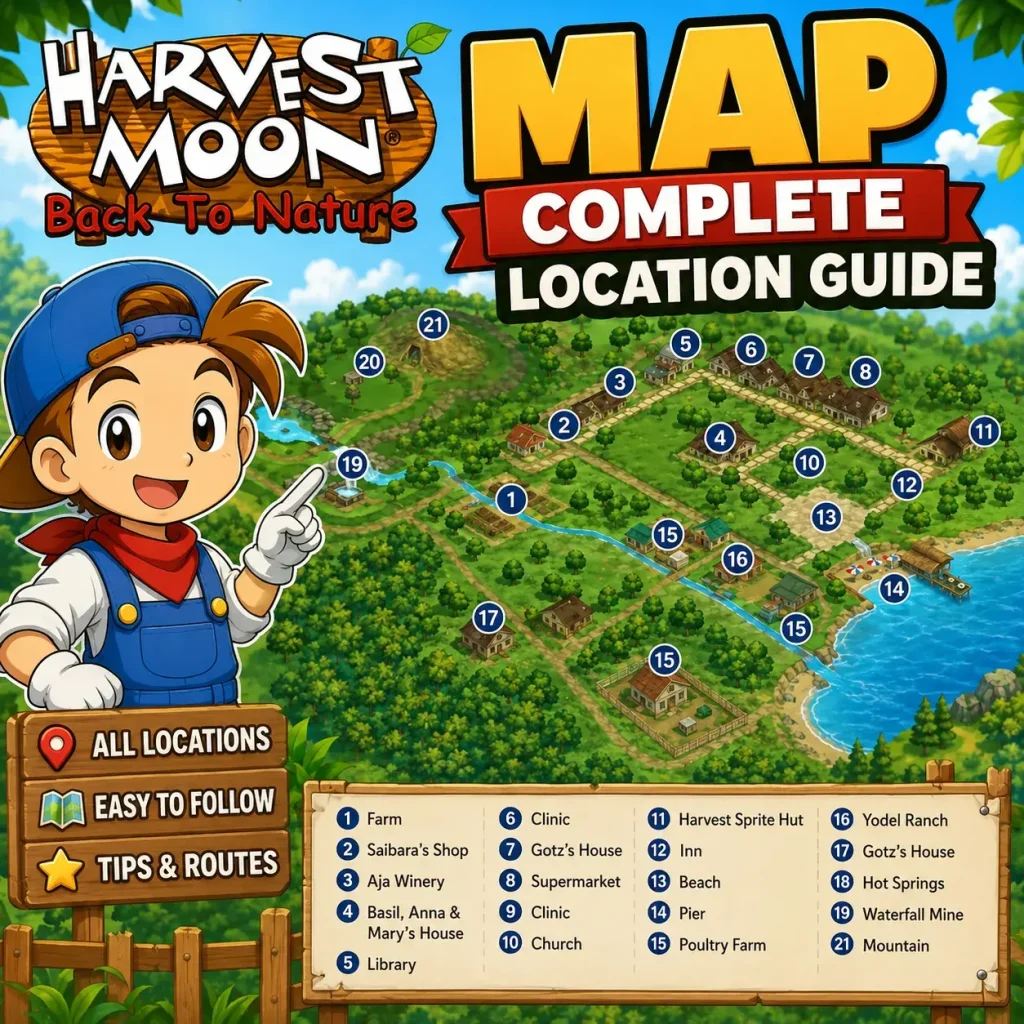
Ruminesia – Have you ever spent an entire in-game day walking around Mineral Town, only to realize you forgot to buy seeds, upgrade a tool, or talk to an important villager? It happens more often than you might think, especially if you’re still learning the Harvest Moon Back to Nature Map. Without a clear route, it’s surprisingly easy to waste both time and stamina.
What many players don’t realize is that the map is more than just a way to find buildings. Every location has its own purpose, from helping you earn more gold and recover stamina to unlocking story events and building relationships with villagers. Knowing where to go—and when to go there—can make your daily routine much more efficient.
Whether you’re playing for the first time or returning after years away, understanding the map will help you get more out of every season. In this guide, you’ll find a complete breakdown of every important location, practical daily routes, money-making spots, and useful tips to help you navigate Mineral Town like an experienced farmer.
Key Highlight
- Learn the Harvest Moon Back to Nature Map to save time and reduce unnecessary travel.
- Prioritize daily farm chores before exploring Mineral Town or visiting shops.
- Follow seasonal routes to maximize stamina, profits, and relationship-building opportunities.
- Visit key locations strategically instead of wandering across the map without a plan.
- Use Winter to focus on mining, tool upgrades, and earning extra gold efficiently.
- Small route improvements can make every in-game day more productive and enjoyable.
The Harvest Moon Back to Nature Map is divided into several key areas, each serving a different purpose throughout the game. Some locations focus on farming and livestock, while others are ideal for shopping, mining, fishing, or building relationships with villagers. Understanding how these areas connect will help you plan a more efficient daily routine and make the most of your time in Mineral Town.
| Area | Main Function |
|---|---|
| Farm Area | Grow crops, raise livestock, and manage your daily farming activities. |
| Town Area | Visit shops, interact with villagers, trigger events, and participate in festivals. |
| Beach Area | Fish, forage for seasonal items, and experience character events near the shoreline. |
| Mountain Area | Gather wild plants, chop lumber, mine ores, and access important resource locations. |
| Mother’s Hill | Explore scenic areas, trigger seasonal events, and unlock memorable story moments. |
| Hot Springs | Restore stamina for free after farming, mining, or other physically demanding activities. |
Whether you’re a beginner learning the basics or a returning player optimizing your daily schedule, understanding these key areas makes navigating Mineral Town much easier. As you continue exploring the Harvest Moon Back to Nature Map, you’ll naturally develop efficient travel routes that help you balance farming, earning money, building friendships, and progressing through the story.
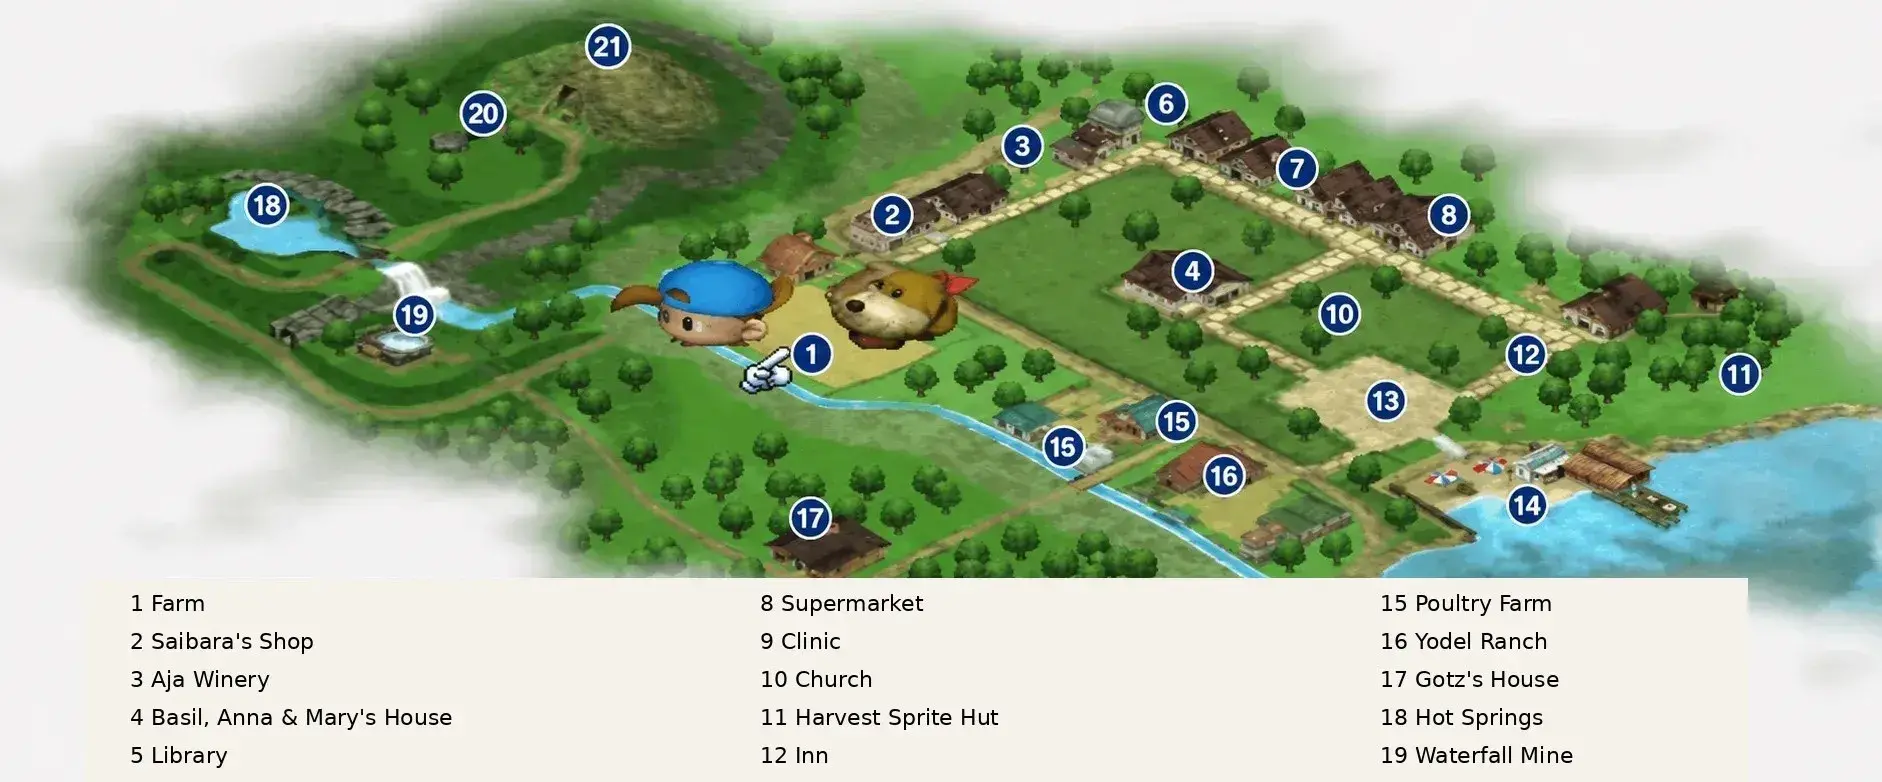
Learning the Harvest Moon Back to Nature Map is one of the easiest ways to make each in-game day more productive. Every location serves a different purpose, whether it’s helping you earn more money, upgrade your farm, or strengthen relationships with villagers.
Instead of wandering around without a plan, knowing where to go and when to visit can help you maximize your limited time and stamina. In practice, experienced players often follow a consistent daily route that combines farming, shopping, socializing, and resource gathering in a single trip.
Here’s how each important location on the map can support your progress.
The Farm is the most important location on the Harvest Moon Back to Nature Map because it’s where every in-game day begins. This is where you’ll plant crops, care for livestock, and build the farming business that supports your progress throughout the game. Developing a consistent morning routine here helps you make better use of your limited stamina and time.
Besides handling daily chores, your farm gradually evolves as you unlock new buildings, animals, and equipment. Many experienced players always finish watering crops and tending animals before leaving for town to avoid missing important tasks. Following this habit makes the rest of your daily route much easier to manage while keeping your farm productive every season.
Saibara’s Shop is the village blacksmith, making it one of the most valuable places you’ll visit as your farm expands. Here, you can upgrade essential tools such as the hoe, watering can, axe, hammer, and sickle using ores collected from the mines. Better tools allow you to complete farm work faster while reducing the amount of stamina consumed each day.
Interestingly, many beginners delay upgrading their equipment because they focus only on earning money. In practice, investing in stronger tools early often saves more time than buying additional crops or animals immediately. Regular visits to Saibara’s Shop can significantly improve your overall efficiency throughout every season.
The Aja Winery is more than just a place that produces wine, as it also serves as an important social location in Mineral Town. Several villagers spend time here, giving you opportunities to build friendships and unlock character events. If you’re pursuing certain marriage candidates, stopping by the winery regularly can become part of your daily routine.
Besides relationship building, the winery contributes to the relaxed atmosphere that makes the game memorable. What many players don’t realize is that small conversations over multiple visits gradually unlock new dialogue and story moments. Visiting consistently is usually more rewarding than trying to raise affection through gifts alone.
This house belongs to Basil, Anna, and Mary, making it an essential destination if you’re interested in getting closer to Mary. Speaking with the family regularly allows you to experience additional dialogue while steadily increasing Mary’s affection through thoughtful gifts. Building relationships here feels more natural when you visit as part of your normal route around town.
Besides romance, the family also adds depth to the overall story of Mineral Town through their unique personalities and conversations. Many players underestimate how important frequent interactions are compared to giving expensive presents. Spending just a few minutes here each day can steadily move your relationship forward without requiring much extra effort.
The Library may seem like a quiet building, but it contains valuable information that many players overlook during their first playthrough. Reading the books inside introduces useful knowledge about farming, villagers, and several game mechanics that aren’t explained elsewhere. It’s one of the easiest places to deepen your understanding of the game without spending any money.
Besides offering helpful references, the Library is also where you’ll frequently meet Mary during certain times of the day. This makes it a convenient location for players who want to improve their friendship while learning more about the world. Taking a short break here can be surprisingly rewarding, especially if you’re still discovering how different systems work in Harvest Moon: Back to Nature.
The Clinic is where you can purchase recovery items and experience several character-related events throughout the game. While you may not need to visit it every day, it becomes an important stop during busy farming seasons when your stamina is constantly being tested. Certain story events also take place here, making occasional visits worthwhile even if you’re not buying anything.
Besides serving practical purposes, the Clinic helps expand the game’s social side by introducing unique conversations with its residents. What many players don’t realize is that some interactions only become available after visiting regularly over time. Including the Clinic in your daily route ensures you won’t miss useful events while staying prepared for demanding farm work.
The Supermarket is your primary destination for purchasing seeds, cooking ingredients, and other everyday supplies. Every new season brings different crop selections, making this one of the first places you should visit when the calendar changes. Planning your shopping ahead of time helps you maximize every growing season without unnecessary delays.
Besides buying seeds, it’s also a smart place to stock up on items you’ll frequently need throughout the year. Experienced players often purchase seeds before the current season ends so they can begin planting immediately on the first day of the next season. This simple habit saves valuable time and helps generate income much earlier.
The Church is one of the quieter locations in Mineral Town, but it still plays an important role throughout the story. Several villagers spend time here, and various events are triggered depending on the season, weather, and your relationships. Visiting occasionally allows you to experience more of the game’s world beyond farming alone.
Interestingly, many new players overlook the Church because it doesn’t provide direct financial rewards. In practice, the location contributes to character development and helps make the village feel more alive. Spending a few moments here now and then can unlock conversations and scenes that add depth to your overall adventure.
The Harvest Sprite Hut is home to the Harvest Sprites, helpful companions who can greatly reduce your daily workload. After building a good relationship with them, you can ask them to water crops, care for animals, or harvest produce while you focus on other activities. Their assistance becomes increasingly valuable as your farm continues to expand.
Besides saving time, the Harvest Sprites give you more freedom to explore other areas on the Harvest Moon Back to Nature Map. Instead of spending the entire day completing repetitive chores, you can go mining, fishing, or building friendships around town. Learning how to make the most of their help is one of the biggest efficiency upgrades in the game.
The Inn becomes one of the busiest gathering places in Mineral Town during the evening. Many villagers visit after work, making it one of the easiest locations to meet several people without traveling across the map. If you’re trying to build friendships efficiently, the Inn should become part of your regular evening routine.
Besides offering convenient social opportunities, the Inn also hosts certain story events that help develop relationships with different characters. What many players don’t realize is that simply visiting at the right time can unlock conversations that aren’t available elsewhere. Ending your day at the Inn is an easy way to strengthen multiple friendships before returning to your farm.
The Harvest Sprite Hut is where the Harvest Sprites live, and it can become one of the most valuable locations later in the game. By building friendships with the Sprites, you can ask them to help with tasks such as watering crops, harvesting produce, or taking care of your animals. Their support allows you to spend more time exploring Mineral Town instead of handling every chore yourself.
What many players don’t realize is that the Harvest Sprites become even more useful as your farm continues to grow. Managing a larger farm alone can quickly consume your entire day and leave little time for mining or social activities. Making regular visits to the hut ensures you always have reliable helpers whenever your workload becomes overwhelming.
The Inn is one of the busiest places in Mineral Town during the evening, making it an excellent location for meeting multiple villagers at once. Instead of searching around the map, you can often find several familiar faces gathered here after they finish their daily routines. This makes relationship building much more efficient, especially later in the game.
Besides being a popular gathering place, the Inn also hosts several character events and unique conversations. Interestingly, some interactions only occur during specific hours or after reaching certain friendship levels with villagers. Stopping by the Inn before ending your day can help you strengthen relationships while experiencing more of the game’s story.
The Town Square serves as the center of community life in Mineral Town and hosts most seasonal festivals throughout the year. Whether you’re participating in competitions or simply joining celebrations, this location offers plenty of opportunities to interact with villagers outside their normal routines. Festivals also provide rewards and memorable moments that make each season feel unique.
Besides being entertaining, festivals often increase friendship with multiple villagers at the same time. The problem is that many events only happen once each year, so missing them means waiting until the following season. Checking the calendar regularly ensures you never miss an important celebration or valuable reward.
The Beach is a peaceful location where you can fish, collect seasonal items, and trigger several special events. Many villagers visit the shoreline throughout the day, making it another great place for casual conversations while enjoying the relaxing scenery. Spending time here offers a nice break from the busy routine of managing your farm.
Besides its beautiful atmosphere, the Beach can also become a useful source of extra income through fishing. What many players don’t realize is that visiting regularly increases your chances of discovering unique events tied to certain characters. It’s a simple destination that combines relaxation, exploration, and practical rewards in one place.
The Poultry Farm is where you can purchase chickens and supplies needed to begin raising poultry on your farm. Chickens are one of the earliest livestock investments because they produce eggs consistently and require relatively little maintenance. For many players, this becomes the first step toward building a more stable daily income.
Besides buying chickens, you’ll occasionally return here for additional supplies as your farm expands. Starting with poultry also helps you learn the basics of animal care before investing in larger livestock like cows and sheep. A well-managed chicken coop can provide reliable earnings while supporting the long-term growth of your farming business.
The Yodel Ranch is the place to buy cows, sheep, and other livestock that can significantly increase your farm’s income. As your farming business grows, raising animals becomes an excellent way to earn money from products like milk and wool. Visiting the ranch regularly also allows you to purchase supplies needed to keep your livestock healthy and productive.
Besides expanding your farm, investing in livestock creates a more balanced source of income throughout the year. Crop profits can fluctuate depending on the season, but animals continue producing valuable goods with proper care. Building a successful ranch takes patience, yet it often becomes one of the most rewarding parts of progressing through the game.
Gotz’s House is where you’ll find the carpenter responsible for upgrading your home and improving your farm buildings. Whether you want a larger house, a bigger barn, or additional facilities, Gotz is the person who can make those improvements possible. Before requesting construction, you’ll need to prepare enough lumber and money to cover the cost.
Besides collecting the required materials, it’s worth planning your upgrades carefully based on your current goals. Many experienced players prioritize barn or coop expansions before upgrading their house because additional livestock can generate income more quickly. Choosing the right upgrade at the right time helps you progress more efficiently without wasting valuable resources.
The Hot Springs are one of the best places to recover stamina without spending any money. After a long morning of farming, chopping wood, or mining, taking a short soak restores your energy and allows you to continue working for the rest of the day. This makes the Hot Springs one of the most practical locations on the Harvest Moon Back to Nature Map.
Interestingly, many beginners rely too heavily on food and recovery items even though the Hot Springs provide a completely free alternative. Visiting this location whenever your stamina gets low can save both money and valuable supplies. Making it part of your daily route is especially useful during your first year when resources are still limited.
The Waterfall Mine is your primary source of ores and valuable materials needed for upgrading tools at Saibara’s Shop. Digging deeper into the mine increases your chances of finding better resources, but it also consumes a significant amount of stamina. Bringing food before entering is highly recommended if you plan to spend several hours mining.
Besides supplying upgrade materials, mining is also a reliable way to earn extra money by selling valuable ores. What many players don’t realize is that upgrading your tools becomes much easier when you make regular mining trips instead of waiting until you urgently need materials. Consistent visits help you prepare for future upgrades while keeping your farm development on schedule.
Mother’s Hill is a peaceful area that offers beautiful scenery, relaxing walks, and access to several memorable story events. Although there aren’t many daily activities to complete here, visiting the hill allows you to experience a different side of Mineral Town beyond farming and business. It’s the perfect destination when you want to explore or simply enjoy the atmosphere of the game.
Besides its scenic environment, Mother’s Hill is connected to important character interactions that appear during specific seasons or weather conditions. Many players only visit when an event requires it, but exploring the area more often helps you appreciate the world-building that makes the game so charming. Taking time away from farm work occasionally makes the overall experience feel much more rewarding.
The Mother’s Hill Summit is the highest point on the map and serves as the setting for several unforgettable moments in the game. Reaching the summit often rewards players with special events, unique interactions, and breathtaking views that showcase the peaceful atmosphere of Mineral Town. Although you won’t visit every day, it’s a location that leaves a lasting impression throughout your journey.
Besides offering beautiful scenery, the summit reminds players that Harvest Moon: Back to Nature is about more than simply earning money or expanding a farm. Some of the game’s most meaningful memories happen in quiet places like this, where story and exploration come together naturally. Visiting the summit from time to time adds a sense of adventure and helps make your playthrough feel more complete.
The Harvest Moon Back to Nature Map is much easier to understand when you think of it as several connected areas instead of individual locations. Each area supports different activities, helping you plan a faster and more efficient daily route.
A well-planned route helps you save time, reduce unnecessary travel, and make better use of your stamina. Use these seasonal routes as a starting point, then adjust them to fit your own farming goals and playstyle.
Tip: Treat these routes as a starting point. Adjust them based on your current goals, whether you’re farming, mining, or building relationships with villagers.
If you’re new to the game, following a simple daily routine is the easiest way to stay productive. This beginner-friendly route helps you manage farm chores, explore Mineral Town, and make steady progress without wasting time or stamina.
Not every location on the Harvest Moon Back to Nature Map needs to be visited daily. Prioritizing the places below can help you save time, improve your farm, and progress faster throughout the game.
| Location | Visit Daily? | Why It Matters |
|---|---|---|
| Farm | ✅ Yes | Complete daily chores like watering crops, feeding animals, and collecting products. |
| Supermarket | ⚪ Sometimes | Buy seeds, animal feed, or cooking ingredients when supplies are running low. |
| Saibara’s Shop | ⚪ When Needed | Upgrade your tools after collecting enough ores and money. |
| Harvest Sprite Hut | 🟢 Frequently | Ask the Harvest Sprites to help with watering, harvesting, or caring for animals. |
| Hot Springs | 🟡 When Tired | Restore stamina for free after farming, mining, or chopping wood. |
| Inn | 🌙 Every Evening | Meet multiple villagers in one place and build friendships more efficiently. |
| Waterfall Mine | ⚪ Frequently | Gather ores for tool upgrades and earn extra gold by mining valuable minerals. |
| Beach | ⚪ Sometimes | Fish for additional income and trigger character events. |
| Library | ⚪ Occasionally | Meet Mary and learn more about the game’s mechanics through books. |
| Town Square | 🎉 During Festivals | Join seasonal festivals to earn rewards and increase friendship with villagers. |
Earning gold becomes much easier when you know which locations offer the best opportunities. The places below can help you build a steady income throughout different stages of the game.
Each season in Harvest Moon: Back to Nature offers unique activities, events, and opportunities. Visiting the right locations at the right time can help you earn more money, trigger special events, and make better use of the Harvest Moon Back to Nature Map.
| Season | Recommended Location | Why You Should Visit |
|---|---|---|
| Spring | Town Square | Join seasonal festivals, meet villagers, and strengthen friendships through community events. |
| Summer | Beach | Fish for extra income, collect seasonal items, and trigger character-related events. |
| Fall | Mother’s Hill | Gather forageable items, enjoy seasonal scenery, and experience special story events. |
| Winter | Winter Mine | Mine rare ores and valuable gems while crop farming is on hold, making it one of the best money-making locations in winter. |
Getting familiar with the Harvest Moon Back to Nature Map is only the first step. These practical tips will help you travel more efficiently, save stamina, and make faster progress throughout the game.
Even with a good understanding of the Harvest Moon Back to Nature Map, small mistakes can slow your progress. Avoid the common pitfalls below to save time, manage your stamina more efficiently, and get the most out of each in-game day.
Read Also:
Frequently Asked Questions About Harvest Moon Back to Nature can help both new and returning players understand important game mechanics more quickly. Below are concise answers to some of the most common questions about the game.
To improve your chances of winning the Swimming Festival:
Getting a horse is straightforward during your first year:
Power Berries are special items that permanently increase your maximum stamina. They can be obtained through activities such as mining, winning festivals, purchasing from the TV Shopping Network, fishing, and exchanging Horse Race medals. Collecting all 10 Power Berries makes farming, mining, and ranching much more efficient.
To obtain the Mystic Berry, you must offer cucumbers to Kappa at Mother’s Hill Lake:
There are five marriage candidates in the game:
To marry one of them, raise her affection level until her heart turns red, and meet all marriage requirements.
The Blue Feather becomes available after reaching certain relationship milestones:
The fastest way to befriend Harvest Sprites is through gifts and regular visits:
Fish Food is used to feed fish in your farm pond. Without it, fish will not reproduce or increase in number. Feeding fish regularly helps maintain and grow your fish population over time.
House upgrades are handled by Gotz, the town carpenter:
To perform well in the Horse Race Festival:
Understanding the Harvest Moon Back to Nature Map isn’t just about knowing where every building is. It’s about learning how each location fits into your daily routine, whether you’re growing crops, upgrading tools, building friendships, or earning more gold. Once you become familiar with the map, planning each day feels more natural and much less stressful.
Interestingly, the biggest difference between new and experienced players often isn’t the size of their farm—it’s how efficiently they move around Mineral Town. A simple change in your daily route can save valuable time, conserve stamina, and open up more opportunities to explore everything the game has to offer.
As you continue playing, you’ll probably discover a routine that works best for your own goals and playstyle. If you have a favorite route, a useful shortcut, or a location you always visit first, feel free to share your experience in the comments. It might help another player enjoy their journey through Mineral Town even more.